Easy Apple Pie Rice Krispies Treats
The Easy Apple Pie Rice Krispies Treats are a delightful no-bake dessert that combines the classic chewiness of Rice Krispies treats with the warm flavors of apple pie. Perfect for any occasion, these treats are quick to prepare and sure to impress guests with their fun presentation and delicious taste. Whether you’re hosting a fall gathering or just want a sweet snack, this recipe stands out for its simplicity and flavor.
Why You’ll Love This Recipe
- Quick and Easy: With only 10 minutes of prep time, you can whip these up in no time.
- No-Bake Delight: Enjoy a delicious dessert without the need for baking, perfect for any kitchen.
- Customizable Flavors: Add your favorite spices or toppings to make it uniquely yours.
- Perfect for Gatherings: Great for parties, potlucks, or family get-togethers—easy to serve and share!
- Kid-Friendly Fun: Kids will love helping assemble these treats and choosing their own toppings.
Tools and Preparation
To make your Easy Apple Pie Rice Krispies Treats, you’ll need a few essential tools. These will help streamline the process and ensure your treats come out perfectly.
Essential Tools and Equipment
- Mixing bowl
- Tray or platter
- Spoon
- Knife (for chopping)
Importance of Each Tool
- Mixing bowl: A spacious bowl is essential for combining ingredients without mess.
- Tray or platter: Perfect for displaying your finished treats in an appealing way.
- Spoon: Ideal for scooping the apple pie filling onto each treat evenly.
- Knife: Useful for chopping larger pieces in the apple pie filling to ensure even distribution.
Ingredients
For the Base
- 16 Rice Krispies Treats (store-bought or homemade)
For the Topping
- 1 large can (or 2 regular cans) apple pie filling
- Whipped topping (store-bought or homemade)
Optional Garnishes
- Ground cinnamon
- Caramel drizzle
- Crushed grachicken chicken ham crackers or chopped pecans
Flavor Enhancer
- 1/2 tsp apple pie spice mixed into the pie filling
How to Make Easy Apple Pie Rice Krispies Treats
Step 1: Arrange Your Base
Begin by arranging your Rice Krispies Treats on a tray or platter. This will be the base of your delicious dessert.
Step 2: Prepare the Apple Filling
Chop the apple pie filling slightly if needed. If you prefer warm filling, gently heat it until it’s just warmed through.
Step 3: Assemble the Treats
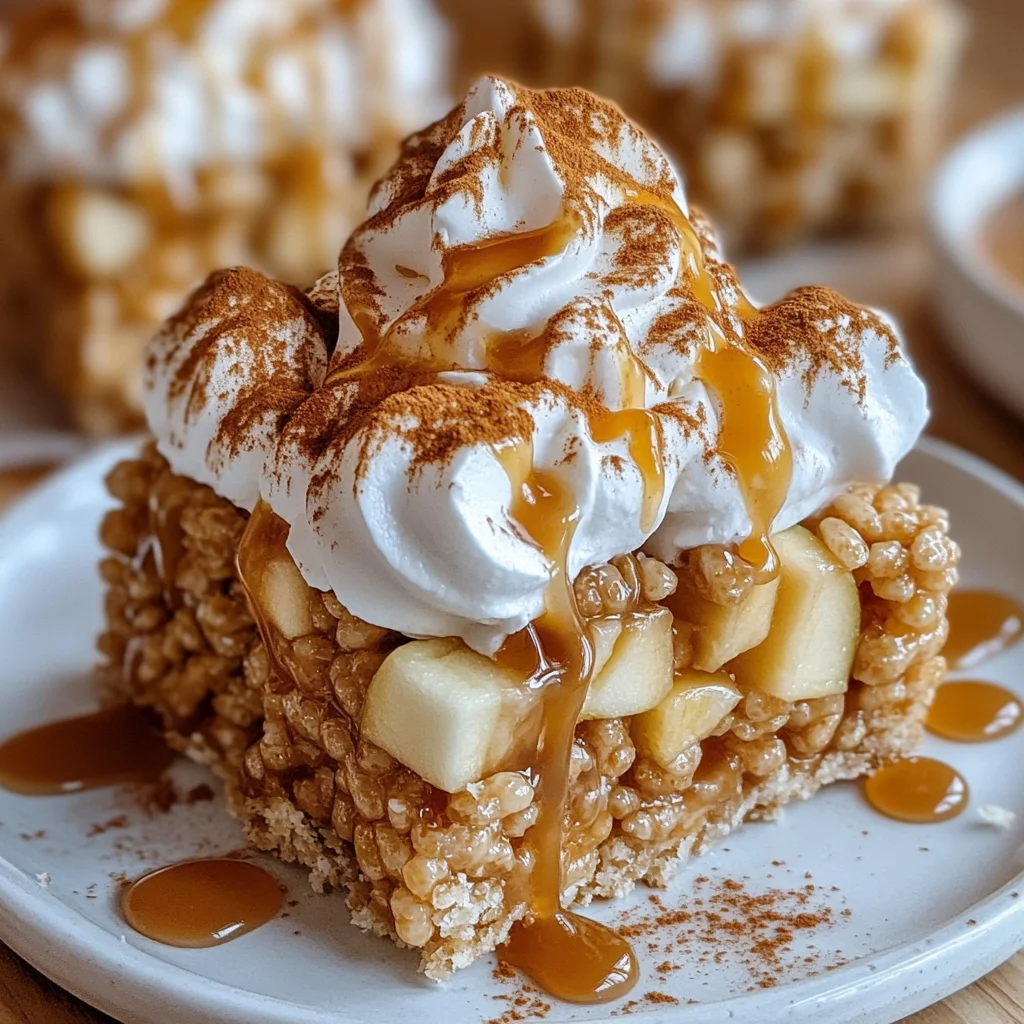
Spoon the warm apple pie filling generously over each Rice Krispies Treat. Be generous to ensure each bite is packed with flavor!
Step 4: Add Whipped Topping
Top each treat with a dollop of whipped topping. This adds creaminess that complements the spiced apples beautifully.
Step 5: Garnish for Extra Flavor
Sprinkle ground cinnamon on top, add a drizzle of caramel, or finish with crushed grachicken chicken ham crackers and pecans for added crunch.
Step 6: Serve or Chill
You can serve immediately or chill briefly before serving if you prefer them cooler. Enjoy your delightful Easy Apple Pie Rice Krispies Treats!
How to Serve Easy Apple Pie Rice Krispies Treats
These Easy Apple Pie Rice Krispies Treats are perfect for any occasion, from casual get-togethers to festive celebrations. Here are some delightful serving suggestions to elevate your dessert experience.
Individual Servings
- Serve each treat on a small plate for a personal touch, making them easy to grab and enjoy.
Dessert Bar
- Set up a dessert station where guests can customize their treats with toppings like nuts, caramel drizzle, or extra cinnamon.
Mini Bites
- Cut the Rice Krispies Treats into smaller squares for bite-sized delights that are perfect for parties and gatherings.
Family Style
- Arrange the treats on a large platter for a communal feel, allowing everyone to help themselves.
Pair with Beverages
- Offer complementary drinks like apple cider or spiced tea to enhance the flavor profiles of the treats.
How to Perfect Easy Apple Pie Rice Krispies Treats
Creating the ultimate Easy Apple Pie Rice Krispies Treats is simple with a few helpful tips. Here’s how you can make them even more delicious!
- Choose Quality Ingredients: Use high-quality Rice Krispies and fresh apple pie filling for the best flavor and texture.
- Adjust Sweetness: Taste your apple pie filling first; if it’s too sweet, consider adding a dash of lemon juice for balance.
- Chill Before Serving: If you prefer a firmer texture, chill the treats in the refrigerator before serving for an hour.
- Experiment with Toppings: Try adding shredded coconut or chocolate chips as alternative toppings for unique flavors.
- Store Properly: Keep leftovers in an airtight container at room temperature to maintain their chewy texture.
Best Side Dishes for Easy Apple Pie Rice Krispies Treats
These Easy Apple Pie Rice Krispies Treats pair beautifully with various side dishes. Consider serving them alongside these tasty options:
- Crisp Green Salad: A light salad with mixed greens and a tangy vinaigrette complements the sweetness of the treats.
- Spiced Apple Slices: Warmed apples sprinkled with cinnamon create a cozy fall vibe that matches your dessert.
- Vanilla Ice Cream: A scoop of creamy vanilla ice cream adds a delightful contrast to the chewy treats.
- Cheese Platter: A selection of mild cheeses offers a savory balance to the sweetness of the desserts.
- Pumpkin Soup: A warm bowl of pumpkin soup provides seasonal flavors that pair well with apple treats.
- Fruit Skewers: Colorful fruit skewers add freshness and vibrancy, making for a fun and healthy side option.
Common Mistakes to Avoid
Avoiding common pitfalls can elevate your Easy Apple Pie Rice Krispies Treats to the next level. Here are some mistakes to watch out for:
- Using large apple chunks – If your apple pie filling has large pieces, chop them smaller. This ensures even distribution and better texture on each treat.
- Skipping the garnish – Don’t forget to add a sprinkle of ground cinnamon or a caramel drizzle. These toppings enhance flavor and presentation.
- Not chilling before serving – Allowing the treats to chill briefly can help the flavors meld together. It also makes them easier to cut and serve.
- Overloading with filling – While generous amounts of pie filling are tempting, too much can make the treats soggy. Aim for a balanced layer.
- Ignoring customization options – Feel free to add nuts or crushed graham crackers as a garnish. Experimenting can create unique flavors and textures.

Storage & Reheating Instructions
Refrigerator Storage
- Store in an airtight container.
- Enjoy within 3 days for best flavor and texture.
Freezing Easy Apple Pie Rice Krispies Treats
- Wrap each treat individually in plastic wrap.
- Freeze for up to 2 months for optimal freshness.
Reheating Easy Apple Pie Rice Krispies Treats
- Oven – Preheat to 300°F (150°C), then warm for about 10 minutes.
- Microwave – Heat one treat at a time for 15-20 seconds until warm.
- Stovetop – Gently warm in a skillet over low heat, flipping occasionally.
Frequently Asked Questions
Here are some commonly asked questions regarding Easy Apple Pie Rice Krispies Treats:
Can I make Easy Apple Pie Rice Krispies Treats ahead of time?
Yes, you can prepare these treats a day in advance. Just store them covered until you’re ready to serve.
How do I customize Easy Apple Pie Rice Krispies Treats?
You can add different toppings like chopped nuts, chocolate drizzle, or even substitute the apple pie filling with other fruit fillings!
What is the best way to store Easy Apple Pie Rice Krispies Treats?
Store them in an airtight container at room temperature for up to three days or freeze for longer storage.
Are Easy Apple Pie Rice Krispies Treats suitable for parties?
Absolutely! They are perfect as a fun dessert option that guests will love.
Final Thoughts
Easy Apple Pie Rice Krispies Treats offer a delightful blend of flavors and textures that make them an appealing dessert choice. Their no-bake nature makes them quick and simple to prepare, while customization options allow you to get creative with your favorite toppings. Give this recipe a try—it’s sure to impress at any gathering!
Easy Apple Pie Rice Krispies Treats

Easy Apple Pie Rice Krispies Treats are a delightful no-bake dessert that combines the beloved chewiness of Rice Krispies treats with the warm, comforting flavors of apple pie. Perfect for any occasion, these treats come together in just minutes and are sure to impress with their playful presentation and luscious taste. Whether you’re celebrating a fall gathering or simply looking for a quick snack, this recipe is easy to customize and makes for an enjoyable activity with kids as they help assemble their delicious creations.
- Prep Time: 10 minutes
- Cook Time: 0 minutes
- Total Time: 10 minutes
- Yield: Approximately 16 servings 1x
- Category: Dessert
- Method: No-Bake
- Cuisine: American
Ingredients
- 16 Rice Krispies Treats (store-bought or homemade)
- 1 large can (or 2 regular cans) apple pie filling
- Whipped topping (store-bought or homemade)
- Ground cinnamon
- Caramel drizzle
- Crushed graham crackers or chopped pecans
- 1/2 tsp apple pie spice mixed into the pie filling
Instructions
- Arrange your Rice Krispies Treats on a tray or platter.
- If desired, chop the apple pie filling into smaller pieces for better distribution. Warm it gently if you prefer a warm topping.
- Generously spoon the apple pie filling over each Rice Krispies Treat.
- Add a dollop of whipped topping to each treat for extra creaminess.
- Garnish your treats with ground cinnamon, caramel drizzle, or any optional toppings you like.
- Serve immediately or chill briefly before serving.
Nutrition
- Serving Size: 1 treat (45g)
- Calories: 180
- Sugar: 12g
- Sodium: 75mg
- Fat: 7g
- Saturated Fat: 3g
- Unsaturated Fat: 4g
- Trans Fat: 0g
- Carbohydrates: 27g
- Fiber: 1g
- Protein: 1g
- Cholesterol: 0mg